
While I hadn't felt the need for a hand brake on my KickPed in the first year I owned it, certain members of the Let's Kick Scoot Forum are such huge proponents of hand brakes, that I got to wondering what I was missing. Given that I'm a bike mechanic by trade and will take almost any excuse to go to the hardware store, I put together a hand brake for my KickPed.
The brake lever I used is a little DiaTech BMX lever that I had in my parts box. I combined this with some other bike bits (a brake cable and housing, a cable binder bolt, a barrel adjuster and a brake pad) together with some parts I picked up at my local Lowe's hardware store. Someone with a less extensive home collection of bike bits could buy a Promax Brake Assembly and get all the bike-specific bits in one package. A trip to the hardware store is still needed for a few bolts, nuts and other metal bits.
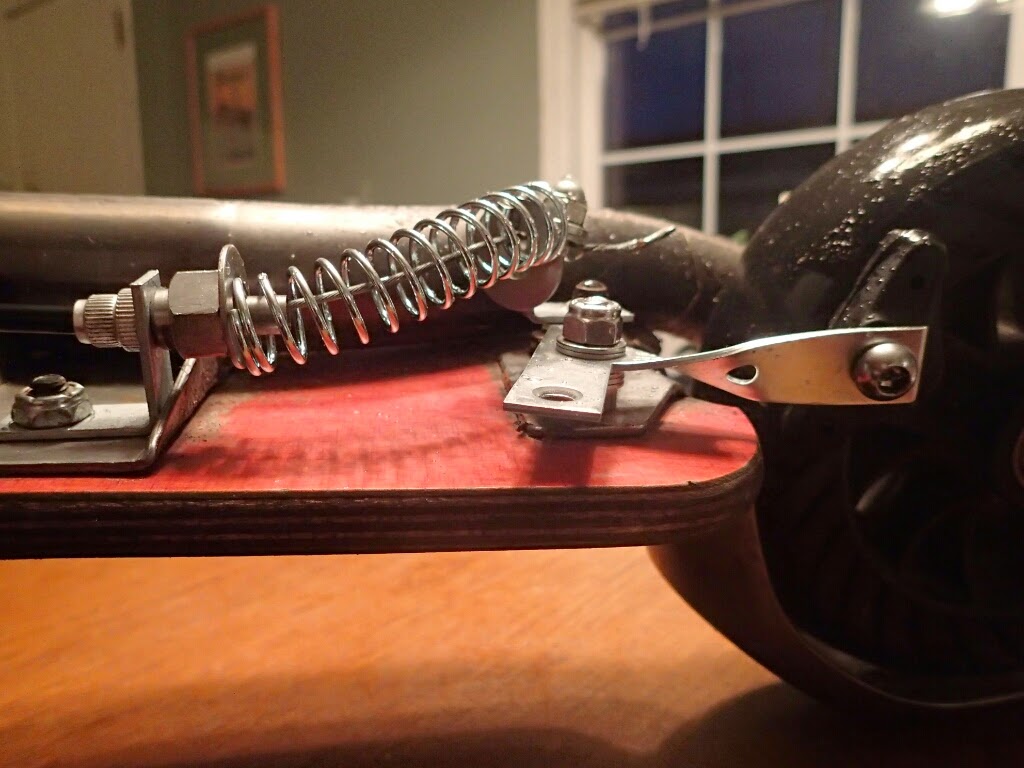
The pictures tell the main story, but here are a few notes that may make things a bit clearer.
I didn't have to drill or cut anything on the Kickped, so assembly was easy. Best, if I didn't like the outcome, I knew I'd be able to completely remove the parts, returning the Kickped to its original state.
I replaced one of the rear deck bolts with a stainless steel 1/4-20x1-1/2 bolt. This longer bolt serves as the brake pivot.
The brake arm is a Stanley 3"x3" T-Plate. I gave the stem of the T a half-twist with a pair of pliers so the brake shoe would line up with the edge of the tire.
The big spring holds the brake away from the rear wheel when the brake lever is not pressed. When I press the brake lever, the spring compresses, the arm pivots and the brake pad rubs the tire.
1" steel corner braces are used for the cable stops. I used various washers and nuts to get the spacing right for the brake pivot and the proper tension on the spring.


My first test of the brake was a scooter trip in the rain. It worked!
The KickPed's rear stomp brake is not very efficient in wet conditions and the hand brake with its rubber on rubber interface is an improvement. The one-sided (versus dual) hand brake seems to be efficient enough. This isn't a stop-on-a-dime brake, but I did a little testing in the Issaquah, Washington, drizzle.
Our paths are concrete with seams every six feet. To test, I counted the seams to see how long it would take to go from speedily rolling to a stop once I hit the brakes. Here's what I found:
Using the stock fender brake alone - 5 seams, or 30 feet.
Using my hand brake - 3 seams or 18 feet.
Using both the fender brake & hand brake - 2 seams, or 12 feet.
This test was conducted on a slick day and the distances were reached on level ground. My speed measurement was based upon how far it took me to go from about 8 mph down to 0 mph. Your mileage may vary.
In dry conditions, both the hand and fender brakes work well.


The hand brake has proven to be, well, handy! It's not the prettiest thing, but it works fine and I think it's a keeper. It adds a little bit of weight to the KickPed and I'll be keeping an eye on brake pad and tire wear.
Keep 'em rolling (and slowing and stopping!)
Kent


3 comments:
Hi Kent. I recently got into kick scooters and found your blog while researching how not to melt my sneakers while using the fender brake. Haha.
How did the mod work out long term? Did you literally) burn through the sidewalls of the tires? Still love it? Hate it? Thanks for the details!
Hi Bryce,
Years later, the brake is still on the scooter & still holding up. The tire is tougher than the brake pad, so no noticeable wear.
If I was going to do it from scratch now, I'd see if I could find an old long-reach BMX brake (I recall one called the Bulldog). It would probably have less flex and have even more stopping power. But for my purposes, what I have works great.
Okay, great to know it has worked out long-term. For my Razor A5 Lux, where the rear, aluminum fender is melting my sneaker, I am going to try a less involved approach first by bolting down a section of bicycle road tire to the top of it in hopes of insulating and preventing the transfer of heat from the metal fender to the bottom of my shoe. If that doesn't work out perhaps I will get more involved like your solution. It's very ingenuitive. Thanks for sharing!
Post a Comment